Are you trying to make a Taser at home? Maybe you’re wondering how to make a taser out of a pen? If you are an avid do-it-yourselfer then you’ve come to the right place. It can be difficult to embark on creating such an intricate electrical device on your own. I will be breaking down the process with you step by step so that you will easily and quickly have a fully function conducive electronic weapon of your own! Ah, yea!
- PROFESSIONAL SELF DEFENSE EQUIPMENT: Powerful heavy duty stun gun flashlight combination. Delivers painful stoppping power and backed by a Lifetime...
- SNATCH PREVENTION TECHNOLOGY: Shock plates on the side of the stun gun will shock an attacker if they attempt to take the gun from you; Contoured grip...
- INTERNAL RECHARGEABLE BATTERY: Our stun gun simply plugs into a standard wall outlet for a complete recharge. No Batteries needed! Charging cord...
Here’s What You Need:
- A Pen – Any kind of pen will work, you are using it mainly for the housing of the device. Make sure it is a pen made of non-conductive material, like plastic. A metal housing will just shock you when you turn on the stun gun.
- BBQ Lighter – You can use an old one that’s stopped working or buy a new one if you don’t have one available. If you use an old one that stopped working we will need to check that the ignite is still working which we will cover in step 1.
- Philips head screwdriver – Even if you don’t have this, any substitute will work. I personally use a swiss army knife or even a pair of scissors to unscrew just about anything when I’m dismantling old stuff. This is just going to be for dismantling the BBQ lighter.
- Pair of Scissors – You’re just using this to strip the wires. Your fingernails will work too if you have nothing else.
- Electrical Tape – You can use regular tape at your own discretion but it is always safer to use electrical tape especially when doing things by yourself.
What we are actually going to be making here is a Stun Gun, as opposed to a Taser. The reason we are doing this is simply that the Taser will require you to stick in an electrode into the pen and fire this out as a projectile.
While this is entirely possible with a welding electrode, it is not going to be safe at all. You will essentially be firing an electrified, long piece of metal at somebody and while the shock itself will not cause permanent damage, it would certainly turn the device into a lethal weapon from the metal dart being fired with such force into a person’s body.
Remember! Even though we are taking the safer route it is still DANGEROUS working with electricity! We take no liability for any accidents or injuries that may occur and you are fully responsible for your actions. So please, be safe and responsible!
Step By Step Guide To Making A Pen Into A Taser
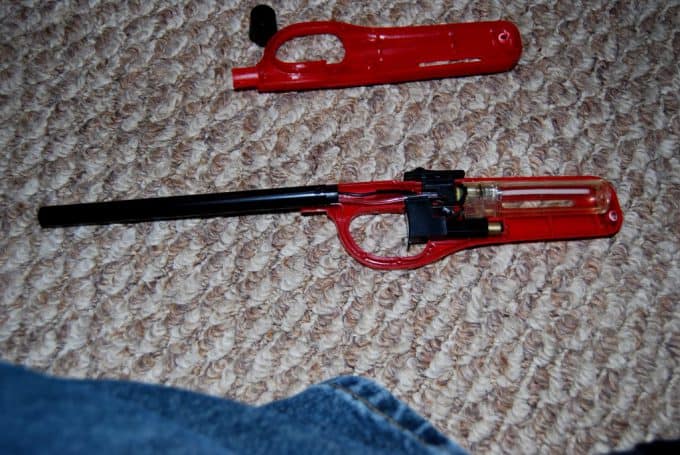
Step 1: Dismantle the BBQ Lighter
This is where you’ll use the Philip’s head screwdriver to undo the screw(s) on the BBQ lighter. Depending on what model of BBQ lighter you have you may have 1-3 screws that you need to undo. Once it’s pulled apart you can remove the wires from the nozzle and essentially just pull all the pieces out.
The piece you want here is the spark igniter. This is the piece that has the 2 wires attached to it with another plastic piece that is attached to the trigger part of the lighter. The ignite itself has a little crystal on the top where the wires come out of.
At this point, if you are using a no-longer-working BBQ lighter then you will want to test the spark igniter. Simply click the white plastic piece in towards the trigger. You can hold the igniter with your forefinger and the trigger with your thumb. Don’t worry, there’s no danger of getting shocked here.
When you click it you will want to look closely at the crystal piece that the wire feeds into. If you see a little spark when you click it, then you are good to go! You’re igniter is working.
Step 2: Cut down the wires
The two wires coming out of the igniter are going to be different lengths. Simply cut the long wire down so that it is the same length as the short one. That’s it! These are going to act as your stun gun electrodes that hold the arc of the electrical current.
You can compare the lengths to the length of the pen if you wish. If you make sure the wires are longer then you will enable the metal pieces of the wires to stick right out of the end of the casing.
Don’t worry if the shortest wire is shorter than the length of the pen because you can always cut down the size of the pen to match the wires as well. Either way is equally effective making this quite a versatile design depending on what you want!
Step 3: Strip the END of the wires
The two wires that you have cut down to equal lengths now need a small amount of the plastic removed. Simply use a pair of scissors and strip off just a couple centimeters of plastic so that the metal part of the wires are exposed.
Step 4: Dismantle the Pen
Take apart the pen so you have the inside removed and of course the cap is taken off. You can discard the inside of the pen and the cap so that you just have the plastic casing of the pen remaining.
Step 5: Assemble the Igniter to the Pen
At this point, you simply want to attach the spark igniter to the end of the pen. This is where you will use electrical tape to attach the plastic piece that holds the wires and the crystal to the pen. The black trigger of the lighter DOES come off depending on the BBQ lighter you’re using. It is not necessary to keep it on unless you prefer it.
Either way, you don’t want to put tape on the black trigger or on the white piece that’s underneath the trigger. The white piece underneath is the actual trigger mechanism that you will push to activate the stun gun. This part should be sticking off the end of the pen while the piece holding the wires and crystal is flush against the pen and attached with tape.
Step 6: Tape the Wires
Please read this step carefully and if you are not fully clear on the understanding of this step then I would watch the video to obtain a visual understanding as well.
At this point, you want to use the electrical tape to tape the wires up the length of the device. Again, if the pen is longer than the wires you can cut off the pen part if you want the wires to stick directly out from the end of the device. Alternatively, you can fold the metal parts of the wire outwards away from the pen casing.
It is VERY IMPORTANT that the wires are not touching. You can take a piece of tape and fold it over itself twice or three times to put between the two wires as you’re taping it onto the pen. This will ensure the two wires don’t slide together on accident and touch each other. Again, this is very important. Do not skip this step.
Step 7: Test
Now you have the stun gun put together! Good job! Now you can test it. You simply click the button or trigger (if you left it on) of the BBQ lighter and it will ignite the spark and you will see the arc crossing over the 2 wires. Boom! Stun gun made.
Commonly Asked Questions
Is this dangerous?
It depends. Working with electricity is always dangerous if you aren’t careful. The only danger with this device is if you cross the wires, which is the same with any electrical component.
As far as using the device you are not going to be anywhere near within the range of hurting somebody permanently. This device is only going to produce a couple thousand volts and its amps will be in the range of microamps. It takes 100 MILLIamps to induce levels of cardiac arrest of a human and 1 microamp = .001 milliamp.
So as far as using the device, as long as you have done it correctly, will not be dangerous to use on someone.
Will this be adequate self-defense?
No. Using a pen as a casing does not give you enough room to hold components that are strong enough to be powerful enough to maintain an electrical current that will cause the incapacitating effects of a real stun gun.
This design is just for fun and something you can show your friends, but do not rely on this as your primary self-defense in real life situations.
Now You’re Done!
I sincerely hope you have enjoyed this tutorial on how to make a taser out of a pen. At this point, you should have a functional conducive electrical weapon in the form of a stun gun! Awesome!
Remember, you can use regular tape but I would highly advise the electrical tape when working with electrical components. It just makes sense! Now, being an expert, you can teach all of your friends! Happy crafting!
If you liked this guide you’ll like this one on making a taser from household items.

- Optimized self-defense range: 15-foot Shooting distance, ideal for most defensive situations
- Powerful protection ensures a safe escape: 30-second muscular override gives you time to get away, and we'll replace your TASER device free of charge
- Effective up close: contact stun capabilities help at close range or in the event of a missed shot